
As a professional mechanic, one of the most critical tasks you’ll encounter is installing valve seals on SBC heads. The proper installation of valve seals is essential to ensure the longevity and performance of an engine.
In this blog post, we’ll provide a comprehensive guide on how to install valve seals on SBC heads. We’ll cover everything you need to know, from the tools required to the step-by-step process of installing valve seals.
Choosing the right valve seals can be overwhelming, with a wide range of options in the market. Selecting the right valve seals that are compatible with your engine’s specifications is essential to ensure optimum performance. We’ll guide you through this process, helping you select the right valve seals specific to your SBC heads.

Equipment Needed For Valve Seal Installation
When it comes to valve seal installation, having the right equipment is essential for a successful job. Firstly, a valve spring compressor tool is necessary to safely remove the valve springs without damaging the cylinder head. Once the valve springs remove, a valve stem seal installer requires to install the new seals onto the valve properly.
A seal driver tool can also use to ensure the seals are properly seated and aligned. In addition, a valve guide seal cutter needs to remove any excess material from the valve guide before installing the new seals. It’s essential to have a good quality micrometer to measure the valve stem diameter and ensure that the correct size seals use.
A valve lapping tool can also be helpful to ensure a proper seal between the valve and valve seat. Lastly, a torque wrench is necessary to properly tighten the valve spring retainers to the manufacturer’s specifications. All these tools on hand make the valve seal installation process much easier and ensure the job is done.
A Step By Step How To Install Valve Seals On SBC Heads

You’re in luck if you want to install valve seals on SBC heads. This process is relatively straightforward and can do with patience and the right tools. Here’s a step-by-step guide on how to install valve seals on SBC heads:
- Start by removing the valve springs and retainers from the cylinder head. You’ll need a valve spring compressor tool to do this.
- Remove the old valve seal off the valve stem once the springs and retainers remove.
- Clean the valve stem and the valve guide thoroughly. Any debris or dirt can cause the new seal to wear out quickly.
- Place the new valve seal over the valve stem and push it down onto the valve guide. You may need to use a seal installation tool to ensure it’s properly seated.
- Reinstall the valve spring and retainer onto the cylinder head.
- Repeat steps 2-5 for all the valves on the cylinder
How To Install Valve Seals On SBC Heads Removing
If you’re wondering how to install valve seals on SBC heads, the process is actually quite straightforward. First, you’ll need to remove the old valve seals from the cylinder head. This can typically do using a valve spring compressor tool, which allows you to compress the valve spring and remove the spring retainer, valve keepers, and valve spring.
Once the old valve seal is removed, you can install the new seal onto the valve stem and reassemble the valve components in the reverse order you removed them. It’s important to ensure that the valve seal is seated properly onto the valve stem and that all components tighten to the manufacturer’s specifications.
Installing valve seals on SBC heads is an important task that can help improve engine performance and prevent oil leaks. Anyone can complete this job with the right tools and basic knowledge. Just remember to take your time and be patient, as working on an engine requires precision and attention to detail.
Installing The New Valve Seals
Installing new valve seals is important in maintaining your engine’s performance and preventing oil leaks. Before starting the installation process, it’s important to gather all of the necessary tools and materials, including a valve spring compressor, a valve seal installer tool, new valve seals, and a torque wrench.
Remove the valve springs and old seals from the cylinder head. Carefully inspect the valve stems for wear or damage and replace them if necessary. Next, coat the new valve seals with a light layer of engine oil and use the valve seal installer tool to press them onto the valve stems.
Be sure to seat the seals properly to prevent oil leaks. Once the new seals install, reassemble the valve springs and use a torque wrench to tighten the bolts to the manufacturer’s specifications. Finally, check the engine oil level and start the engine to ensure proper operation.
Checking The Installed Valve Seals
Checking the installed valve seals is essential to any engine maintenance routine. Valve seals play an important role in preventing oil from entering the combustion chamber and causing engine buildup, which can lead to rough idling and poor performance.
To check the installed valve seals, remove the valve cover and inspect them for any visible signs of wear or damage. If they look worn or cracked, replacing them before they cause further damage to the engine is important.
Next, use a valve spring compressor to remove the valve springs and lift the valves out of their seats. With the valves removed, you can inspect the seals for any signs of wear or damage. It’s also a good idea to check the valve guides for wear, as this can cause the valve seals to fail prematurely.
If everything looks good, you can reassemble the valves and springs, making sure to torque the bolts to the manufacturer’s specifications. Checking the installed valve seals regularly is an important step in maintaining the health of yours.
Reassembling The Cylinder Heads

When it comes to engine repair, reassembling the cylinder heads can be a daunting task. Ensuring that each component is clean and inspected before proceeding with the reassembly process is important.
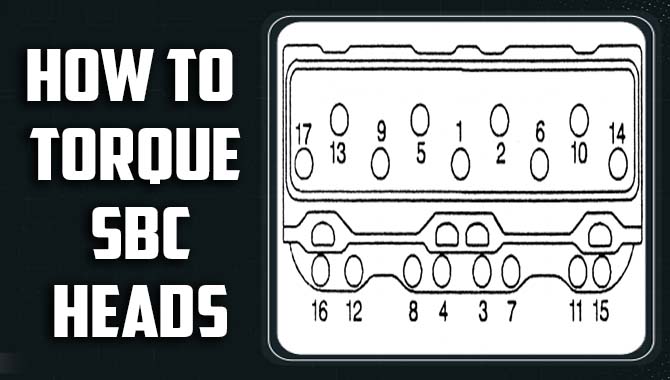
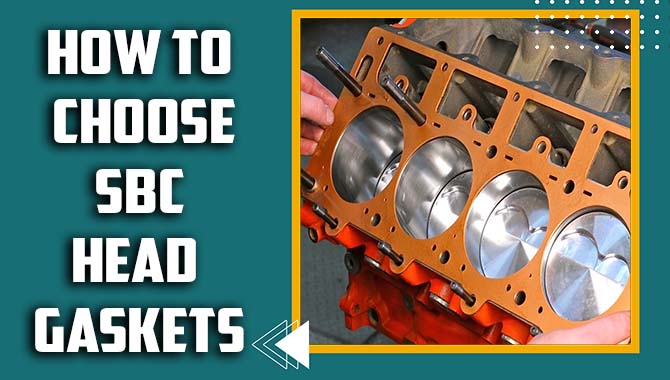
One must also pay close attention to torque specifications and sequence, as mistakes could result in catastrophic engine failure. To begin, the cylinder heads must properly align with the engine block, and the head gasket must be installed correctly. Next, the valves and valve springs must be correctly positioned and secured, followed by the camshaft and timing belt or chain.
The rocker arms and pushrods must also install with careful attention to detail. Once all components are in place, the cylinder head bolts must tighten to the manufacturer’s specifications in a specific pattern to ensure proper sealing and prevent leaks. It is important to take the necessary time and care when reassembling cylinder heads, as any mistakes could result in costly repairs down the line.
Testing For Proper Valve Seal Installation
Testing for proper valve seal installation is critical in ensuring the efficient and safe operation of any system that utilizes valves. In order to achieve a proper seal, a number of factors must take into consideration, including the type of valve being used, the materials it is made from, and the installation method.
The most common methods for testing valve seals include pressure testing, leak detection, and visual inspection. Pressure testing involves applying controlled pressure to the valve and monitoring it for leaks or failures. Leak detection techniques use various sensors and instruments to detect leaks in the valve assembly.
Finally, visual inspection involves thoroughly examining the valve and its associated components to ensure that all parts are properly installed and in good condition.
Proper testing for valve seal installation is essential to ensure that the valve performs as intended, preventing costly leaks and system failures. It is important to perform regular maintenance and testing on all valves to ensure they are operating as expected and to address any issues that may.
Troubleshooting Common Valve Seal Issues
Valve seals are essential to any engine, as they prevent oil from leaking out of the engine and into the combustion chamber. However, valve seal issues are quite common and can lead to a number of problems if left unaddressed.
Some of the most common valve seal issues include oil leaks, excessive oil consumption, and blue smoke from the exhaust. To troubleshoot these issues, it is important to start by inspecting the condition of the valve seals.
If they appear worn or damaged, they may need to be replaced. Additionally, it is important to check the valve guides and stems for wear, as this can also contribute to seal issues.
Other potential causes of valve seal problems include incorrect installation, improper maintenance, and using the wrong type of oil. To prevent these issues from occurring in the first place, it is important to follow proper maintenance procedures and use high-quality parts and fluids.
Maintenance And Replacement Of Valve Seals
Maintenance and replacement of valve seals is an important aspect of ensuring the longevity and efficiency of an engine. Valve seals prevent oil from leaking into the combustion chamber and reduce oil consumption.
Over time, valve seals can wear out or become damaged, leading to oil leaks and decreased engine performance. Regular maintenance and inspection of valve seals can help prevent these issues and prolong the life of the engine. Replacing valve seals every 60,000 to 100,000 miles is recommended, depending on the manufacturer’s recommendations and the driving conditions.
Replacement of valve seals can be a complex process involving the removal of the cylinder head and valve springs. It is important to use high-quality replacement seals and follow proper installation procedures to ensure a proper seal. Neglecting to maintain and replace valve seals can lead to more costly repairs down the line, such as damaged pistons and cylinders.
Conclusion
Knowing how to Solder without solder paste is a crucial task that requires attention to detail and precision. the crucial task that requires attention to detail and precision. Properly installing valve seals on SBC heads is crucial in ensuring optimal engine performance and longevity.
With the right tools and knowledge, this task can be accomplished with ease. It is important to follow the steps carefully and take your time to avoid any mistakes that could result in costly repairs.
By following this guide and using the recommended techniques, you can be confident in your ability to install valve seals on SBC heads like a professional.
FAQs
1.What Are The Signs Of Bad Valve Seals?
Ans: The signs of bad valve seals include blue smoke coming from the exhaust, oil consumption, rough idle, decreased engine performance, and fouled spark plugs.
2.Can Bad Valve Seals Cause A Loss Of Power?
Ans: Yes, bad valve seals can cause a loss of power in an engine.
3.What Is The Sealing Material For The Valve?
Ans: The answer to this question depends on the specific valve in question and the manufacturer’s specifications. Different valves may require different sealing materials, such as rubber, silicone, or metal.
4.How Do You Know If The Valve Seals On SBC Heads Need To Be Replaced?
Ans: There are a few signs that can indicate that the valve seals on small block Chevy (SBC) heads need to be replaced. These include:
- Blue smoke in the exhaust.
- Excessive oil consumption.
- Poor engine performance.
- Oil leaks.
5.What Are The Benefits Of Properly Installed Valve Seals On SBC Heads?
Ans: Properly installed valve seals on Small Block Chevy (SBC) heads can provide several benefits, such as:
- Reduced oil consumption.
- Improved engine performance.
- Extended engine life.
- Reduced emissions.