

In our day-to-day life, we come face to face with many challenges. Aside from the outside problems that we face, there are many household problems as well.
Plumbing is one of the most common maladies encountered by residents. These complaints include old and incompatible piping, faulty fixtures, and drainage systems.
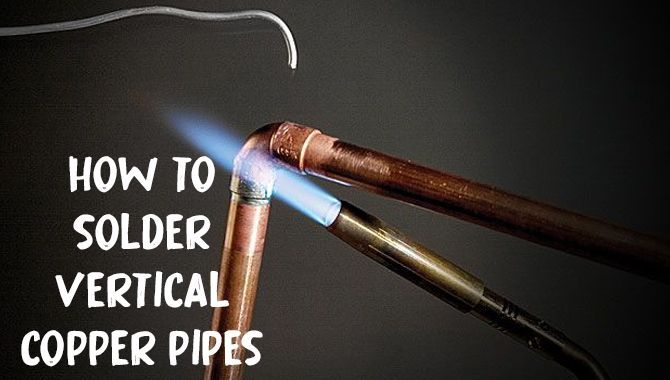
Learning a few basics about plumbing can help you out at home. Soldering copper pipes is an effortless chore. Vertical joints are slightly tricky. However, learning about it will also give you insights into the horizontal joining process. So, how to solder vertical copper pipes?
You will be joining pipes in no time! Above all, these joints will be as good as professional ones. First, we will give a brief insight into the soldering process so that you can conceptualize the latter steps better.
What Is Soldering?
Soldering is a joining process in which two or more items are joined together by melting a filler metal ( solder) in between the items. The adjoining metal has a higher melting point than the filler. Unlike welding, it does not require melting the actual workpieces.
The difference between soldering and brazing is the temperature. Brazing is done at a higher temperature than soldering.
Solder was usually made of tin (Sn) and lead (Pb) in the old days. But now, it is usually lead-free and made of tin, bismuth, antimony, silver, even copper.
Soldering is usually done around 600 degrees Fahrenheit. The molten solder flows into the void inside the joint. Also, the solder is attracted by heat. It flows in the direction of the heat.
The soldier then cools down to create a robust electrical bond. Therefore, soldering upside-down pipe or vertical pipe is not complicated.
The horizontal connection is more accessible than the vertical one. Because there is no restriction and gravity is a friend.
But when working vertically, gravity acts opposite of the flow. Despite this, due to the capillary action and characteristics of solder, it flows upwards.
How To Solder Vertical Copper Pipes?
1. Precaution
Start with a pipe where there is no water flow. Because water is solder’s worst enemy. It brings the temperature down fast, thus inhibits solder from setting correctly.
Tools necessary for this stage are- gloves, inflammable cloth, fire extinguisher, and goggles.
First, put on gloves, then wear goggles. Keep the inflammable cloth on any wooden surface that can catch fire. Keep the fire extinguisher close. In case of a torch malfunction, it is easily accessible.
2. Preparation
To prepare the pipes for soldering, you will need- tube cutter, emery cloth, wire brush, deburring tool.
You will need to cut the pipes to appropriate lengths. To cut it, use a tube cutter. It is the best tool to cut copper pipes. The hacksaw puts too much pressure on the pipe; thus, the pipe can not retain its shape.
Use the emery cloth to clean and buff the surface of the pipe. It should be clean and glossy. An adequately cleaned pipe will have a polished look and a shiny finish.
Use the wire brush to clean the inside of the fitting. If the fitting is a coupling joint, then clean both sides.
Finally, use the deburring tool to get rid of any sharp edges and uneven cuts. If the burr is left on the pipe, the liquid solder accumulates on it. Afterward, it obstructs the water flow.
3. Flux Application
Flux is an acid. It cleans the surface of the pipe from any contamination. the flux oxidizes when applied heat.
It prevents the oxide buildup on the surface of the copper pipe when heated. Oxides prevent the solder from adhering to the pipe surface.
The best type of flux you can use is tinning flux. It has solder powder in it. For this reason, it creates stronger bonds than regular flux. Take a small brush and apply a thin layer of flux to the pipe.
It is suggested not to put flux inside the coupling. The flux will be pushed inside the coupling and accumulate there. This will create leakage in the long run.
Do not put too much flux. Just apply enough of it. As you know, too much flux accumulation results in a leaking pipe. Too little of it will not clean the surface, and the copper will oxidize when heat is applied.
4. Adding Support
This stage is specifically for vertical connections. As you apply heat to the fitting, it expands. So it lets go of the pipe. The pipe falls. Thus it becomes deformed. This can be very frustrating.
To avoid this, you need to provide support. There are few ways of doing it. To secure a pipe temporarily in place, just pinch the coupling and rotate the pipe. But there is also a downside to this.
The solder may not be able to get into the pinched area. This situation creates a void, and the void is called a dry spot. Hence, this is not the best way to provide support.
The next option is easy. Find a piece of wood. Cut it according to the length of space between the studs. Then stick it under the pipe. It will support the pipe and keep it sturdy. Tap on the wood lightly. It will easily come off.
But sometimes it is hard to find a piece of wood. That is why there is another trick. It is readily available, and every plumber owns it.
Use the measuring tape as support under the pipe. Just take the tape measure and set it to the appropriate height under the pipe. Then lock the blade in place. This trick is the most practical one and easiest.
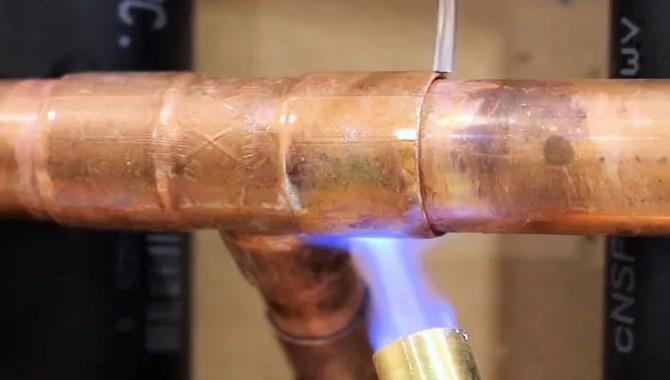
5. Soldering
Soldering vertical pipe joints is a little different than horizontal pipe joints. The main steps are the same for both. But the direction of applying heat is different. Choose a lead-free solder. It is safe for water supply lines.
When soldering horizontally, we apply heat to the pipe, not the fitting. But it is the opposite when it comes to vertical copper pipe soldering.
Apply the flame of the torch to the middle point of the coupling fitting. Keep the flame on one point for some time. work your way around the fitting after heating it enough.
Doing this will ensure even distribution of heat all over the middle portion. If not done so, the molten solder will not flow into cold crevices.
Also, there is another purpose for applying flame at the middle of the fitting. That is, drawing in the solder. As we know already, the solder moves towards heat. In this way, the gap of the fitting will suck the solder in.
Now, bend the solder strand according to the size of the pipe. For a ½ inch pipe, you will need half-inch portion of solder.
Start at the bottom section first. Apply heat to the bottom of the fitting. Hold the solder opposite the flame. Now move the flame upwards and around. The solder will melt and it will sink into the joint.
After finishing this portion, give 1 to 2 minutes break. Otherwise, the heat from the upper part will melt the bottom joint. Now, heat the upper portion of the fitting and apply the solder.
It will drip into the vacancy between the coupling and pipe. Then move the flame towards the middle.
This policy helps the solder to reach deep inside, Where the top and bottom pipe contact. This process seals the joints tightly thus, reduces the chances of leakage.
6. Finishing Properly
Finish soldering by applying another layer of flux. But give the solder 1 to 2 minutes to cool down before that. If the flux is applied over hot solder, the temperature difference creates cracks. The joint will break soon after.
Use a damp rag to wipe away the excess flux. If it is left there, there will be leakage on the pipe in no time. While wiping, be cautious of the dripping soldiers. Do not let it fall on your skin.
Some Potholes To Avoid When Soldering
- You must wait a few minutes before turning the water supply back on. Water is a coolant for solder, and the rapid temperature reduction causes the solder to become brittle. Therefore, it breaks off eventually.
- Remember to turn off the water supply before starting your operation. If the pipe is leaking, wait for it to empty or use a valve right before the joint. Wet and dry vacuum cleaners can drain out the water.
- Too much solder will accumulate on the elbow joint. Then the water flow will stop.
- Also, there needs to be an opening on the line somewhere. Like, an open faucet or valve or the other end of the pipe. The reason for this is, relieve pressure buildup inside the pipes.
Conclusion
The instructions mentioned above and bits of advice are very convenient for anyone to follow. When you put this knowledge to a practical test, you will learn many more tricks.
This experience will widen your knowledge further. If any problem occurs at your home or your neighbor’s, do not hesitate to lend your helping hand. I hope now you know how to solder vertical copper pipes.