
If you want to improve your engine performance, installing hardened valve seats is a great place to start. Hardened valve seats design to withstand the wear and tear that comes with high-performance engines, helping to prevent valve recession and improving engine longevity.
However, installing hardened valve seats can be daunting, especially if you have never done so. We’ve compiled this step-by-step guide on How to install hardened valve seats in SBC Heads hardened valve seats in SBC heads.
We’ll cover everything you need to know to complete the installation process, including the tools and materials you’ll need, the proper preparation and cleaning steps, and the installation process. We’ll also provide tips and tricks for troubleshooting common problems that may arise during the installation process.
Whether you’re a seasoned mechanic or a DIY enthusiast, this guide will provide all the information you need to complete the job. Your tools, and let’s get started.

How To Install Hardened Valve Seats In SBC Heads
If you’re looking to install hardened valve seats in your Small Block Chevy (SBC) heads, there are several ways to go about it. By following the below steps on How to install hardened valve seats in SBC Heads step-by-step guide:
What Are The Tools And Materials Needed For Installation?
Having the right tools and materials is essential for a successful installation project. Depending on the type of Installation you are doing, the required tools and materials can vary greatly.
For example, if you are installing a new light fixture, you will need tools such as a screwdriver, wire strippers, and a voltage tester. On the other hand, if you are installing a new tile floor, you will need materials such as tiles, grout, cement, and tools such as a tile cutter, trowel, and level.
Regardless of the type of Installation, it is important to have a basic toolkit on hand that includes items such as a hammer, screwdrivers, pliers, and a tape measure. Additionally,
it is always a good idea to have safety equipment such as goggles and gloves to protect yourself during Installation. Ultimately, the tools and materials needed for Installation will depend on your specific project.
How To Prepare The Cylinder Heads For Installation
When preparing cylinder heads for Installation, you should take a few steps to ensure the best performance possible. First, it’s important to thoroughly clean the heads to remove any residue or debris that may have accumulated during the manufacturing process. This can be done using a solvent or degreaser, followed by a thorough rinse and drying.
Next, you’ll want to check the valve seats and guides for wear or damage. If necessary, they can replace or repaired to ensure proper function. It’s also important to check the valve springs and retainers to ensure they are within the manufacturer’s specifications.
Once you inspect and clean everything, it is time to install the cylinder heads.
Use new head gaskets and correctly torque the bolts to the manufacturer’s specifications. Using thread sealant on the bolts is also a good idea to prevent leaks.
Finally, be sure to break in the engine after installation properly. This includes varying the RPMs and avoiding high load.
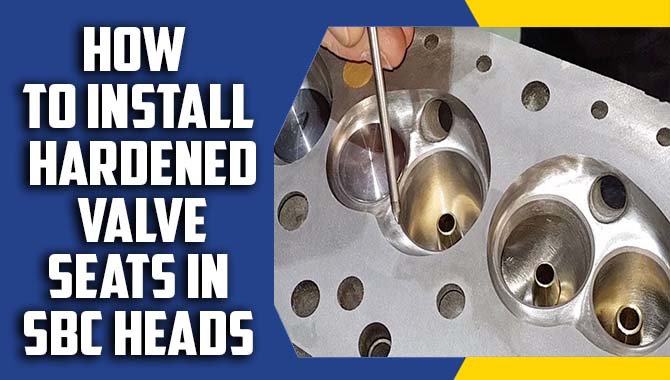
How To Remove Old Valve Seats
Removing old valve seats can seem daunting, but it can do efficiently and effectively with the right tools and techniques.
- The first step is to gather the necessary tools, including a valve seat cutter, a valve seat driver, and a valve seat removal tool. It is also important to have safety gear such as gloves and eye protection. Once you have the tools, start by removing the old valve seat using the valve seat removal tool.
- This can be done by inserting the tool into the old seat and using a wrench to turn it counterclockwise until it comes loose. Next, insert the new valve seat into the cylinder head and use the valve seat driver to properly seat it.
- Finally, use the valve seat cutter to cut the new center to the correct size and shape. It is important to take your time and be precise when cutting the new seat to ensure it fits perfectly and provides a good seal.
With these steps, you can remove old valve seats and replace them.
How To Installing New Valve Seats
Installing new valve seats can be daunting for some, but it can be straightforward with the right tools and knowledge. The first step is to remove the old valve seats, which can do using a valve seat cutter or grinder.
Once the old seats are removed, the new seats can be installed by pressing them into place. Ensuring you correctly align and firmly seat the new seats in the valve guide is important.
This can be done using a seating tool or a valve seat installation driver. It is also important to check that the valve seat fits properly. With the valve stem, as a poorly fitting valve seat can cause engine performance issues. Once the new valve seats are in place,
It recommends performing a leak test to ensure no leaks between the valve seat and the valve guide. This can be done by applying a light coat of lapping compound to the valve seat and rotating the valve back and forth to create a smooth and even seal.
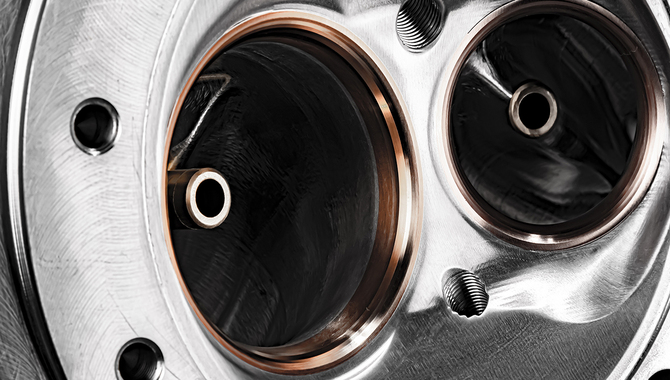
How To Check Valve Seat Fit And Concentricity
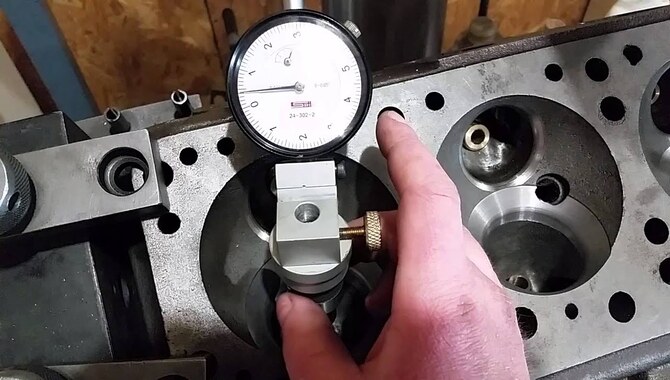
Checking valve seat fit and concentricity is important in ensuring proper engine performance. The fit of the valve seat can greatly affect the flow of air and fuel into the combustion chamber, ultimately affecting power and efficiency. To check the fit, remove the valves and inspect the valve seats for any signs of wear or damage.
Next, use a dial indicator to measure the concentricity of the valve seat. This will determine if the valve seat is properly aligned with the valve guide, which is crucial for proper sealing and combustion. If the concentricity is off, the seat must be re-cut or replaced.
Additionally, check the width of the valve seat and compare it to the valve face for proper contact. If there is insufficient contact, the valve may not seal properly, causing loss of power and potential engine damage. By checking valve seat fit and concentricity, you can ensure your engine runs at its best and avoid costly repairs.
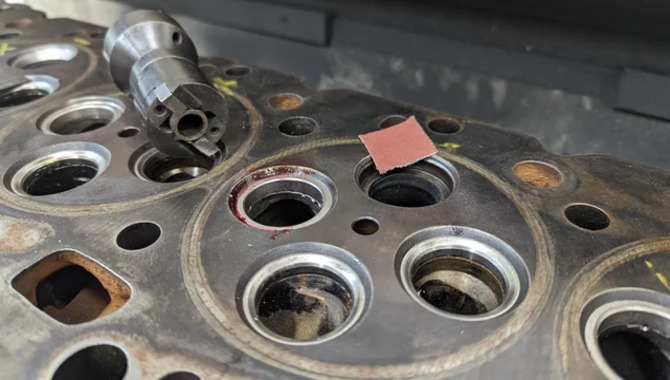
Valve Seat Honing And Finishing
Valve seat honing and finishing are critical to ensure combustion engines’ proper functioning. These processes are essential for creating a smooth, uniform surface on the valve seat, allowing for optimal airflow and sealing between the valve and seat.
Valve seat honing involves using a honing tool to carefully remove any imperfections or irregularities on the surface of the valve seat. This process ensures that the valve will sit flush with the heart, preventing any leaks or loss of compression.
Once the honing process is complete, the valve seat finishes to the desired specifications using a specialized finishing tool. This tool creates a consistent surface finish on the valve seat, which is essential for optimal engine performance. Proper valve seat honing and finishing can improve engine efficiency, power, and reliability.
Experienced professionals typically perform these processes using specialized equipment that requires high skill and precision. Overall, valve seat honing and finishing are crucial steps in manufacturing and maintenance.
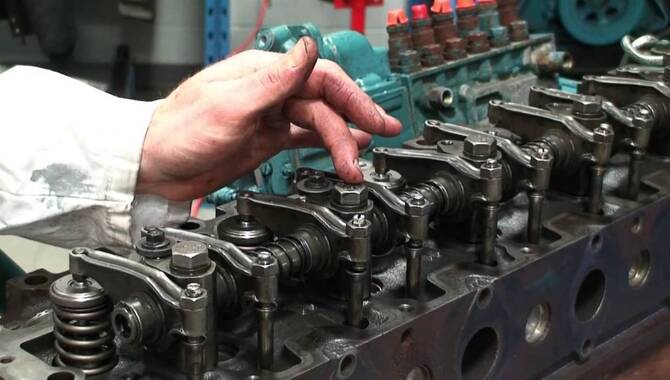
Reassembling The Cylinder Heads

Reassembling the cylinder heads is a crucial step in any engine rebuilding project. It involves carefully cleaning and inspecting the individual parts before putting them back together. The intricate process requires attention to detail, as mistakes can lead to engine failure.
- The first step is to install the new valve guides and seats, followed by the valves and springs. The installer installs and adjusts the rocker’s arms to the correct specifications.
- The cylinder head gasket carefully places on the block, and the head lowers into place. The head bolts are tightened in a specific sequence to the correct torque specification. Once the head is secured, the camshaft is installed and timed correctly with the crankshaft.
- The final step is installing the intake and exhaust manifolds and any other components removed during disassembly. Reassembling the cylinder heads is time-consuming, but ensuring the engine runs smoothly and efficiently is essential.
Testing For Leaks And Proper Valve Seating
Ensuring a system is free from leaks is critical to maintaining its integrity and efficiency. The testing for leaks involves a comprehensive evaluation of the system’s components to detect any potential leaks.
This process includes a visual inspection of the system, using pressure gauges and other diagnostic tools to measure pressure and flow rates, and implementing leak detection techniques such as bubble testing and dye penetration.
Proper valve seating is also essential in preventing leaks, as it helps to maintain a tight seal and prevent fluid or gas from escaping through the valve. Valve seating refers to properly aligning and positioning the valve’s disc or ball with the valve’s seat. Incorrect valve seating can cause leaks and system failures by allowing fluid or gas to escape through the valve.
To ensure proper valve seating, technicians must carefully inspect the valve components, adjust the valve stem and disc or ball, and test the valve’s operation under different conditions.
Maintenance And Care Of Hardened Valve Seats
The maintenance and care of hardened valve seats are crucial to ensure the longevity and optimal performance of the engine. Regular inspection and cleaning of valve seats are necessary to prevent any buildup of debris or deposits that can cause engine issues.
Hardened valve seats are designed to withstand high temperatures and wear but require proper care to function effectively. One way to maintain valve seats is to use high-quality fuel and oil formulated to reduce deposits and keep the engine clean.
Replacing the engine oil and oil filter at the recommended intervals is also important. Inspect valve seats for any signs of wear or damage and replace them if necessary. Proper valve clearance adjustment is also essential to ensure the valve seats work correctly.
Finally, using fuel additives can help keep the engine clean and prevent deposits from forming on the valve seats. The engine can continue to perform at its best by following these maintenance tips, and the hardened valve seats can last many years.
Conclusion
Knowing How to install hardened valve seats in SBC Heads is a crucial task that requires attention to detail and precision. Installing hard You can successfully install hardened valve seats in SBC heads with the right tools and steps.
Needing valve seats in SBC heads can be challenging, but it can be accomplished successfully with the right tools and steps. This step-by-step guide can help you install the seats correctly and securely, thus improving your engine’s overall performance.
With the right tools and knowledge, it is a worthwhile investment that can significantly improve the performance and longevity of your engine.
Taking the time to complete each step carefully, ensuring precise measurements, and correct installation of all components is essential. With patience and attention to detail, you can successfully install hardened valve seats in your SBC heads and enjoy improved engine performance for years.
Faq
1.What Are The Hardened Valve Seats?
Ans: Hardened v Manufacturers install inserts of wear-resistant, hardened valve seats in an engine’s cylinder head. Alive seats are inserts made of a wear-resistant material installed in an engine’s cylinder head.
2.What Is A Hard Seat Valve?
Ans: A hard seat valve is a type of valve that has a valve seat made of a rigid material such as metal or ceramic.
3.Which Kind Of Head Can Use An Insert Valve Seat?
Ans: You can use an insert valve seat with a cylinder head.
4.What Is The Best Angle For A Valve Seat?
Ans: The best angle for a valve seat depends on various factors, such as the engine’s intended use, the type of fuel used, and the valve’s intended purpose. Generally, a 45-degree angle is the most common and versatile angle for most engine applications.
5.What Are The Two Types Of Valve Seats?
Ans: The two types of valve seats are removable and integral.

![5 Best Stock SBC Heads [Reviews With Buying Guide]](https://accuratepicker.com/wp-content/uploads/2022/03/Best-Stock-SBC-Heads-150x150-1.jpg)