
If you’re looking to improve the performance of your small-block Chevy engine, So it is essential to know how to clean SBC heads.
Milling the heads involves removing a small amount of material from the surface of the cylinder head to increase compression and improve airflow. Before you begin, ensuring you have the right tools and safety equipment is important. You’ll need a milling machine, a dial indicator, a carbide-tipped cutter, safety glasses, or a face shield.
To begin, you’ll need to remove the cylinder heads from the engine. Once they’re off, clean the gasket surfaces thoroughly to remove any debris or residue. Mount the cylinder head on the milling machine and use the dial indicator to measure the amount of material you need to remove.
Removing equal material from each cylinder head is important to ensure even compression. Use the carbide cutter to remove the material slowly, checking the progress frequently with the dial indicator.

Tools And Equipment Needed For Milling
-
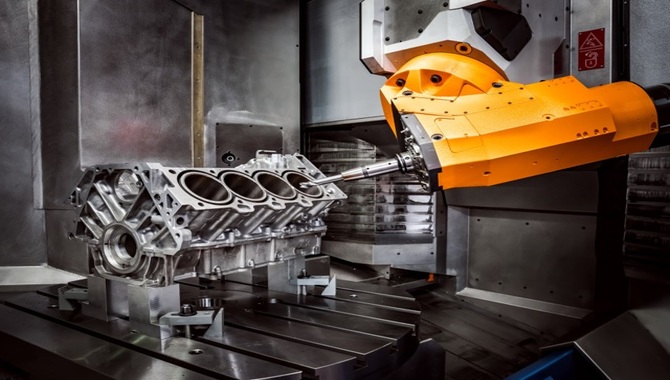
- Milling Machine: A milling machine is the primary tool used for milling operations. It consists of a stationary worktable or bed. A spindle holds the cutting tool, and a motor drives the spindle rotation. There are various types of milling machines, including vertical and horizontal ones, with advantages and applications.
- Cutting Tools: Different cutting tools are used in milling, depending on the specific task. These include end mills, face mills, ball-nose cutters, and slot drills. Cutting tools come in various sizes, shapes, and materials, such as high-speed steel (HSS), carbide, or cobalt.
- Workholding Devices: Workholding devices are used to secure the workpiece to the milling machine’s work table. They ensure stability and precision during the milling process.
- Toolholders: Toolholders are used to hold the cutting tools securely in the milling machine’s spindle. They come in different types, such as collets, end mill holders, and drill chucks.
- Measuring Tools: Accurate measurements are crucial in milling operations. Some commonly used measuring tools include callipers, micrometres, depth gauges, dial indicators, and height gauges.
- Coolant System: A coolant system is often used during milling operations to lubricate the cutting tool and workpiece, dissipate heat, and remove chips.
- Workpiece: The workpiece refers to the material being machined during milling. It can be metal, plastic, wood, or other materials.
- Safety Equipment: Safety is paramount when operating milling machines. Safety equipment includes safety glasses, ear protection, gloves, and protective clothing to safeguard against potential hazards like flying chips, noise, and machine vibrations.
- Chip Removal Tools: Milling produces chips and swarf as the cutting tool removes material from the workpiece. Chip removal tools include brushes, air blowers, or chip conveyors.
- Lubricants and Cutting Fluids: Lubricants and cutting fluids are applied to the cutting tool and workpiece to reduce friction. Dissipate heat and improve machining performance.
A Step-By-Step Guide On How To Mill SBC Heads
You should be interested in improving the performance of your small-block Chevy (SBC) engine. One of the best ways to do so is by properly milling the heads. Milling SBC heads involves removing a small amount of material from the surface of the cylinder head to increase the compression ratio. Which can result in significant power gains? Here is a step-by-step guide on how to mill SBC heads:
- Remove the head from the engine and clean it thoroughly.
- Measure the amount of material that needs to be removed using a straight edge and feeler gauge.
- Clamp the head in a milling machine and set the cutter to the appropriate depth and angle.
- Turn on the milling machine and slowly lower the cutter onto the head, taking care to apply even pressure.
- Mill the head in passes, removing a small amount of material with each pass.
- Keep the head cool during milling to avoid warping by using a coolant spray.
Preparing The Cylinder Head For Milling
Preparing the cylinder head for milling is an important process involving several steps to ensure the final product is precise and accurate. The first step is to clean the cylinder head thoroughly to remove any dirt, grease, or oil that may be present on its surface. You can gently scrub the surface with a degreaser and a soft-bristled brush.
Once the cylinder head is clean. The next step is to inspect it for any cracks, warpage, or other defects that may affect its performance. This you can do using special tools such as a straight edge and a dial gauge. Before proceeding to the milling process, you must correct any defects found.
The next step is determining the correct cylinder head milling depth. This is based on the manufacturer’s specifications and can vary depending on the type of engine and its intended use. Once you determine the milling depth, clamp the cylinder head securely onto the milling machine and begin the milling process.
Measuring And Marking The Head
Measuring and marking the head is crucial in creating a custom-fitted hat. Proper head measurement ensures the hat fits comfortably without being too tight or loose. The first step is to use a soft measuring tape to measure the circumference of the head. Just above the eyebrows and ears. This measurement should record and used to determine the appropriate hat size.
Next, you should measure the height of the head by placing the measuring tape at the centre of the forehead and measuring straight back to the base of the head. This measurement will ensure that the hat sits properly on the head without being too shallow or deep.
Once you take the measurements, it becomes important to mark them with a pen or other type of marking tool so that you can easily reference them during the hat-making process.
Measuring and marking the head is a simple yet crucial step in creating a custom-fitted hat that will be comfortable and stylish. Taking accurate measurements and marking them properly will ensure that the hat fits.
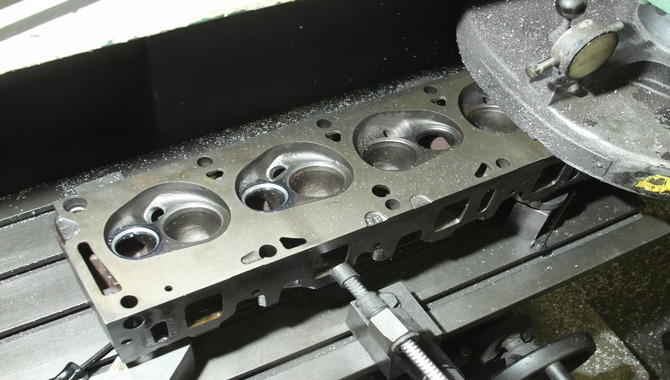
Milling The Head
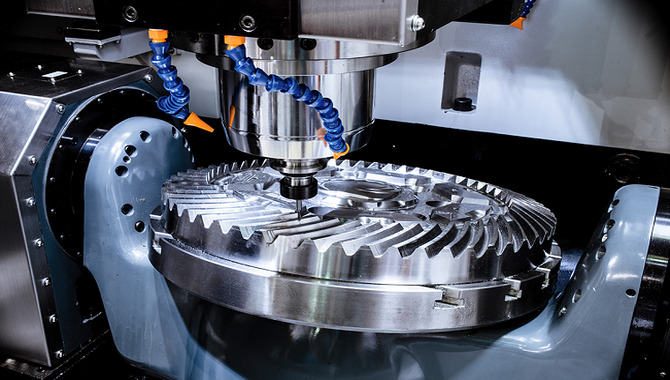
Milling the head is a critical process in engine rebuilding. It involves removing a small amount of material from the surface of the cylinder head to achieve a smooth and flat finish. This helps to ensure a proper seal between the head and the engine block. Preventing oil and coolant leaks and maintaining optimal compression and combustion.
A specialized machine that uses rotating cutters removes the material during milling. The operator carefully calibrates the machine to remove just the right amount of material without compromising the integrity of the head.
The process can be time-consuming and requires high precision and expertise. A skilled machinist must consider the type of engine, the material of the head, and the desired outcome when performing this process.
Milling the head can also be a cost-effective alternative to replacing the entire cylinder head, as it can restore the head to a like-new condition. However, it is important to note that over-milling can lead to decreased compression and valve clearance.
Finishing And Cleaning The Head
To maintain a healthy scalp and luscious hair, you cannot overlook two crucial steps – finishing and cleaning the head. Finishing the head involves using products such as leave-in conditioners, hair oils, and serums to nourish and protect the hair from damage caused by environmental factors and styling tools.
These products help to seal the hair cuticles, reduce frizz, and enhance the shine and texture of the hair. On the other hand, cleaning the head involves using shampoos and conditioners to remove dirt, oil, and product buildup from the scalp and hair. Regular cleansing helps to promote a healthy scalp environment, prevent dandruff and itchiness, and improve hair growth.
It is important to choose the right products that are suitable for your hair type and address any specific concerns you may have, such as dryness, oily scalp, or colour-treated hair.
Setting Up The Milling Machine
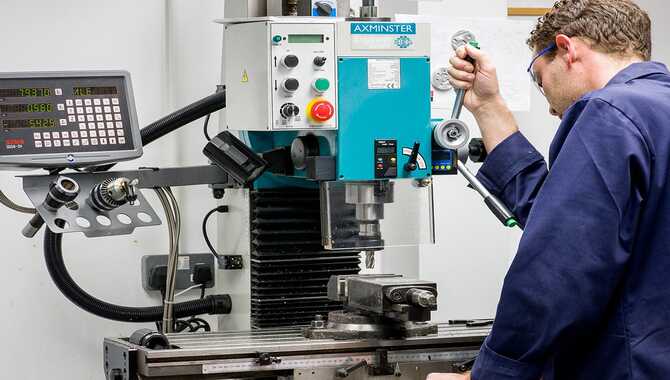
Setting up the milling machine is crucial before beginning any machining operation. You must properly secure the machine to prevent any movement during operation. The first step is to clean the work area and remove any debris or obstacles that may interfere with the setup.
Next, we position the machine on the worktable and level it using a spirit level. Attach the vice to the table, and clamp the workpiece.
Based on the machined material, we select the cutting tool and adjust the spindle speed and feed rate accordingly. You install the cutting tool into the spindle and secure it with a drawbar. The operator carefully positions the workpiece under the cutting tool and must ensure there is enough clearance between the tool and the workpiece.
Once you set up everything correctly, performing a test run is important to ensure that the machine functions properly and you have positioned the cutting tool correctly.
Checking For Proper Fit And Alignment
When dealing with any type of equipment or machinery, it’s crucial to check each component for proper fit and alignment. This is especially important in industries where precision is critical, such as aerospace or medical.
Even the smallest misalignment or improper fit can cause significant problems, leading to equipment failure, downtime, and costly repairs. To ensure precise alignment according to the manufacturer’s specifications, one must carefully measure and inspect each component when checking for proper fit and alignment.
This process typically includes using specialized tools and equipment, such as laser alignment systems, dial indicators, and micrometres. By checking for proper fit and alignment, engineers and technicians can identify potential issues before they cause problems, allowing them to make any necessary adjustments or repairs to keep the equipment running smoothly.
In addition to ensuring functionality and reducing downtime, proper fit and alignment can also improve the overall performance and lifespan of the equipment.
Safety Precautions To Consider
Safety precautions are always an important consideration, no matter what the situation. Whether you’re working in an office environment or on a construction site, there are certain things you need to keep in mind to ensure that you stay safe and avoid accidents.
For example, if you work with heavy machinery or dangerous chemicals, it’s essential that you take the necessary precautions to protect yourself and those around you.
This might include wearing protective clothing, such as gloves or goggles, or using safety equipment like harnesses or face masks. It’s also important to follow proper procedures when handling these materials and be aware of any potential hazards.
Advanced Techniques For Performance Milling
Advanced techniques for performance milling are critical for achieving optimal results when machining metal components. These techniques are commonly employed in high-speed milling operations. Which typically involves reducing cycle times and improving surface finish while maintaining precision and accuracy.
One such technique is adaptive milling, which involves adjusting spindle speed and feed rate in real-time based on changes in cutting conditions. This allows for optimal cutting performance, increased tool life, and reduced machining time.
Another technique is trochoidal milling, which involves using a circular tool path to remove material in a continuous, high-speed motion. This technique reduces tool wear and improves chip evacuation, resulting in a more efficient and effective milling process.
Additionally, high-performance tooling can be used to improve milling performance, with specialized coatings and geometries designed to withstand the high temperatures and stresses associated with high-speed milling.
Finally, advanced software tools and simulation techniques can be used to optimize cutting parameters and predict tool wear, allowing for more accurate and efficient milling operations.
Conclusion
Milling SBC heads is a crucial process that requires adequate knowledge and expertise. With the comprehensive guide in this blog post, you can better understand the steps in milling SBC heads. It is important to note that every engine is unique, and there may be variations in the process.
Therefore, it is crucial to seek professional help if you are not confident in your abilities. Always remember to take the necessary safety precautions when working with machinery to avoid accidents or injury.
So you can successfully learn how to mill SBC heads and improve your engine’s performance with proper care and attention to detail.
FAQ
1.Why Would I Need To Mill SBC Heads?
Ans: Milling SBC heads helps achieve proper sealing and optimize the combustion chamber volume, improving performance and increasing compression ratio.
2.What Effect Does Milling SBC Heads Have On Valve Clearance?
Ans: Milling SBC heads reduces the distance between the valves and the pistons, potentially affecting valve clearance. It’s essential to verify and adjust valve clearance as needed after milling.
3.What Tools Are Required For Milling SBC Heads?
Ans: Tools needed for milling SBC heads include a milling machine, dial indicator, milling cutter, surface plate, and a gasket kit for reassembly.
4.Can I Mill SBC Heads Without Removing Them From The Engine Block?
Ans: Milling SBC heads typically requires removing them from the engine block to ensure precision and prevent damage to other components. It allows for thorough cleaning and proper access to the milling machine.
5.Can I Mill SBC Heads Using Manual Methods?
Ans: While manual methods are possible, they lack the precision and consistency of milling machines. Using a milling machine for accurate and controlled material removal is recommended.
![SBC ARP Rod Bolt Torque Specs [Easy Methods]](https://accuratepicker.com/wp-content/themes/Extra/images/post-format-thumb-text.svg)
![383 Stroker Torque Monster [Easy Steps & Tips]](https://accuratepicker.com/wp-content/uploads/2022/03/383-Stroker-Torque-Monster.jpg)