

Installing fender flares can be an easy and cost-effective way to provide your vehicle with added tire coverage. Fender flares are a type of aftermarket body paneling that is installed on the wheel wells of a vehicle to provide protection from mud, dirt, and debris that can be thrown up from the tires.
n this article, we will discuss the steps necessary to properly install fender flares and provide tips for selecting the right type of flares for your vehicle. With the right knowledge and preparation, you can easily install fender flares to provide your vehicle with added tire coverage. Read on to learn more and find out how to install fender flares for added tire coverage.

Installing Fender Flares: Tire Coverage Made Easy
Installing fender flares is a great way to add tire coverage and protection to your vehicle. Fender flares are easy to install and cost-effective, making them a popular choice for car owners. This article will provide a step-by-step guide on how to install fender flares, including the necessary tools and any additional parts needed
We’ll also cover how to make sure the fender flares are properly secured and look great on your car. So if you’re looking to add some extra tire coverage and style to your ride, read on to learn how to install fender flares.
Gather Supplies
Before you begin installation of your fender flares, it is important to gather all the necessary supplies. Make sure to have the fender flares, the instruction manual, a screwdriver, masking tape, drill, and drill bits. You’ll also need a measuring tool and a marker to make sure everything is properly aligned.
Additionally, you may need sandpaper, a socket wrench, and other tools depending on the type of fender flares you are installing. Having these supplies ready in advance will help make the installation process smoother and easier.
Measure Flares
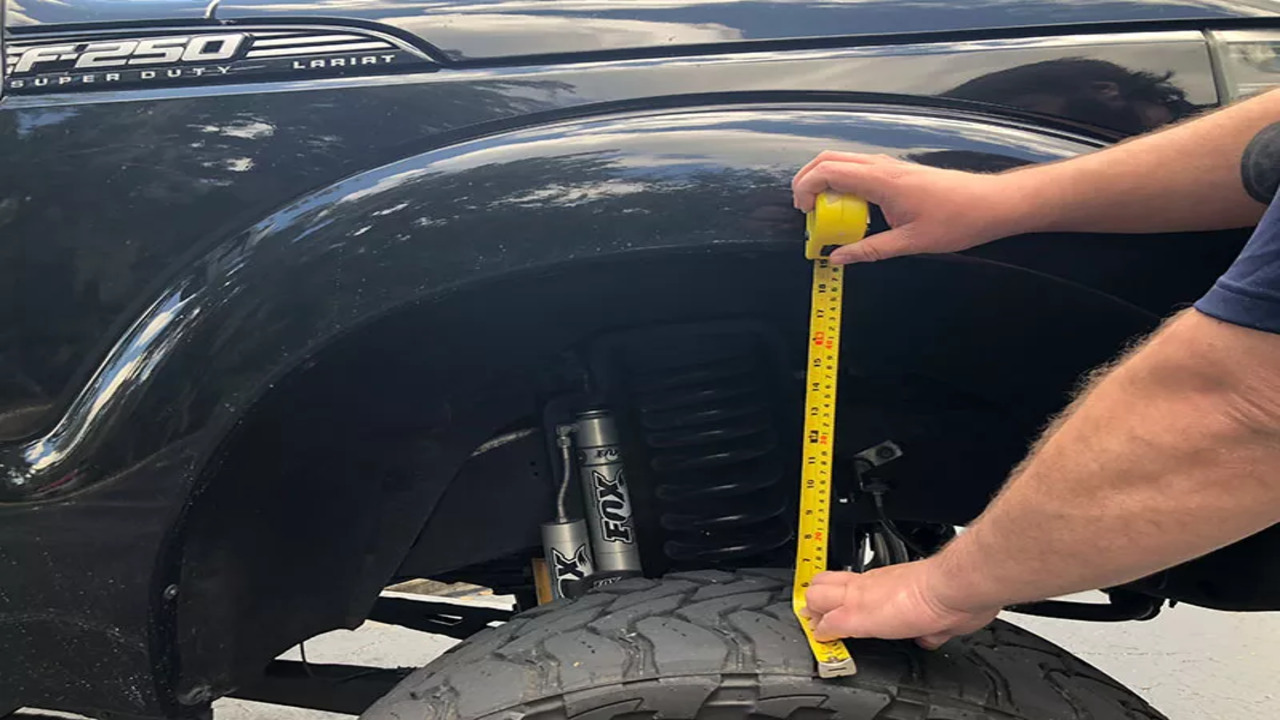
Before installing fender flares, it’s important to measure the flares to ensure they fit the tires properly. First, measure the gap between the tire and the fender. The gap will determine the size of the flare you need.
You’ll also need to measure the tire width and the wheel width to ensure that the flare will fit. If the tire is wider than the wheel, then be sure to measure both the tire and the wheel. Once you have all the measurements, you can select the right size flares for your ride.
Buy Necessary Supplies
Before beginning the installation process of fender flares, it is important to acquire the necessary supplies. This includes the fender flares themselves, as well as any tools needed to complete the job. Depending on the type of fender flares being installed, a vehicle owner may need bolts, screws, tape, or other specialized hardware to complete the installation.
It is recommended to read the manufacturer’s instructions to determine exactly what supplies are needed. Additionally, some vehicles may require additional materials for proper installation. In this case, it is best to consult a professional to ensure that all parts are properly installed. Finally, make sure to purchase enough supplies to complete the job in one go.
Prepare Vehicle

Before installing your fender flares, it is important to properly prepare your vehicle. Begin by parking your vehicle on a flat surface and turning off the engine. Next, inspect the fender flares to ensure that all mounting hardware and installation instructions are included and in good condition.
Remove any screws, clips, or other fasteners that may be holding the old flares in place. Take note of the location of the factory holes and drill any new ones needed for the new flares. Finally, clean the area around the flares to ensure a proper fit. With the vehicle prepped, you are now ready to install the fender flares.
Install Flares
Installing fender flares is a popular way to add extra tire coverage to your vehicle. Whether you’re looking to protect your ride from the elements or simply want to enhance its overall aesthetic, fender flares are a great way to do it. To get started, you’ll need to find a set of flares that fit your vehicle.
Most flares come with instructions, which will provide you with a step-by-step guide to follow. Before you begin the installation, it’s important to read through the instructions and make sure you have all the tools and supplies you’ll need.
Once you’ve got everything, it’s time to install the flares. Start by cleaning the area where you’ll be working and then follow the instructions to attach the flares to your vehicle. Be sure to use the right hardware and tighten the bolts securely. After everything is secured, you can enjoy the added tire coverage and improved look of your vehicle.
Clean Area
Before installing fender flares, it is important to start with a clean area. Make sure the area where you’ll be attaching the flares is free of any dirt, grease, or debris. You may need to use a degreaser or other cleaning agent to remove any oils or other contaminants. Once the area is clean, use a dry cloth or air compressor to dry the area before proceeding with the installation.
This will ensure that the fender flares adhere properly and do not fall off. Additionally, if you are installing fender flares on a vehicle with a painted finish, take extra care to clean the area to prevent any damage.
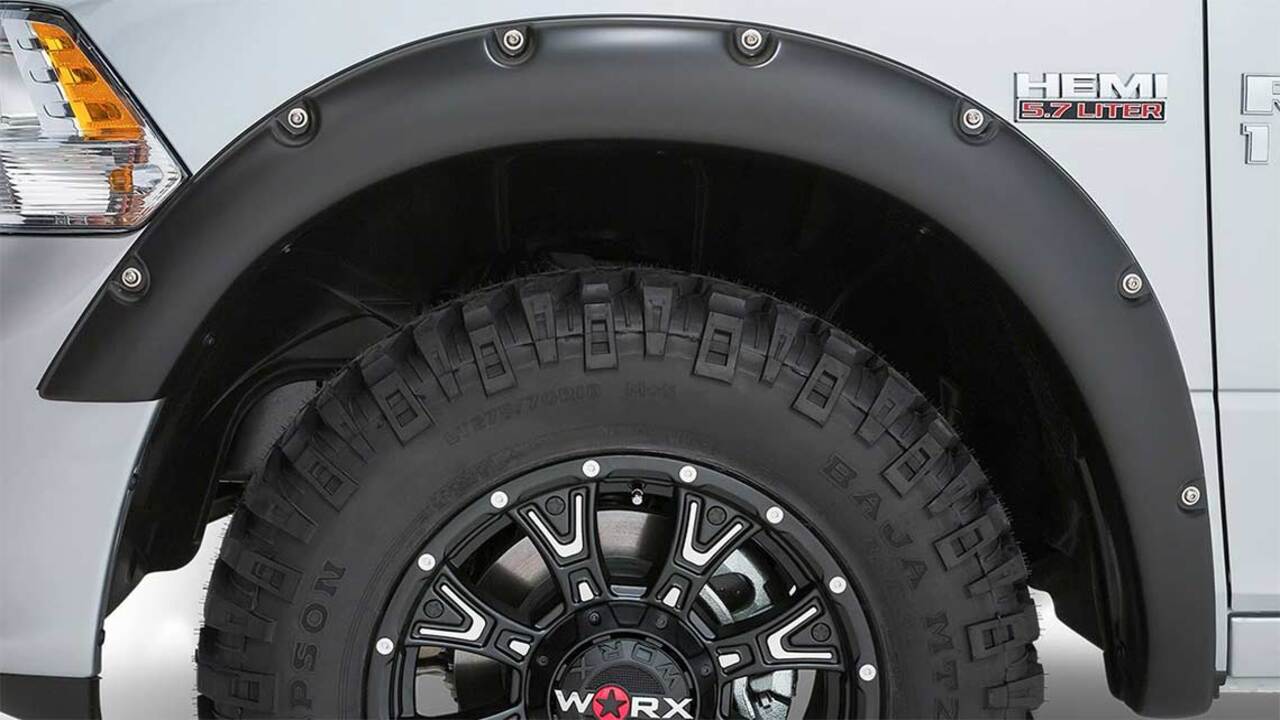
Identify Attachment Points
Once you have the flares, it is time to start the installation process. The first step is to identify the attachment points. This is done by finding the edge of the fender, which is typically marked with an indentation.
Use the indentation as a guide to measure and mark the points where the flare will be attached. When marking the points, make sure they are even and at the same level. Once the points are marked, drill small holes in the fender to use as the mounting points. This will ensure the flare is securely attached to the vehicle.
Make sure you use the right drill bit for the material so you do not damage the fender and the flare. Take your time and make sure these steps are done correctly to ensure the fender flares are securely and properly installed.
Remove Old Fenders
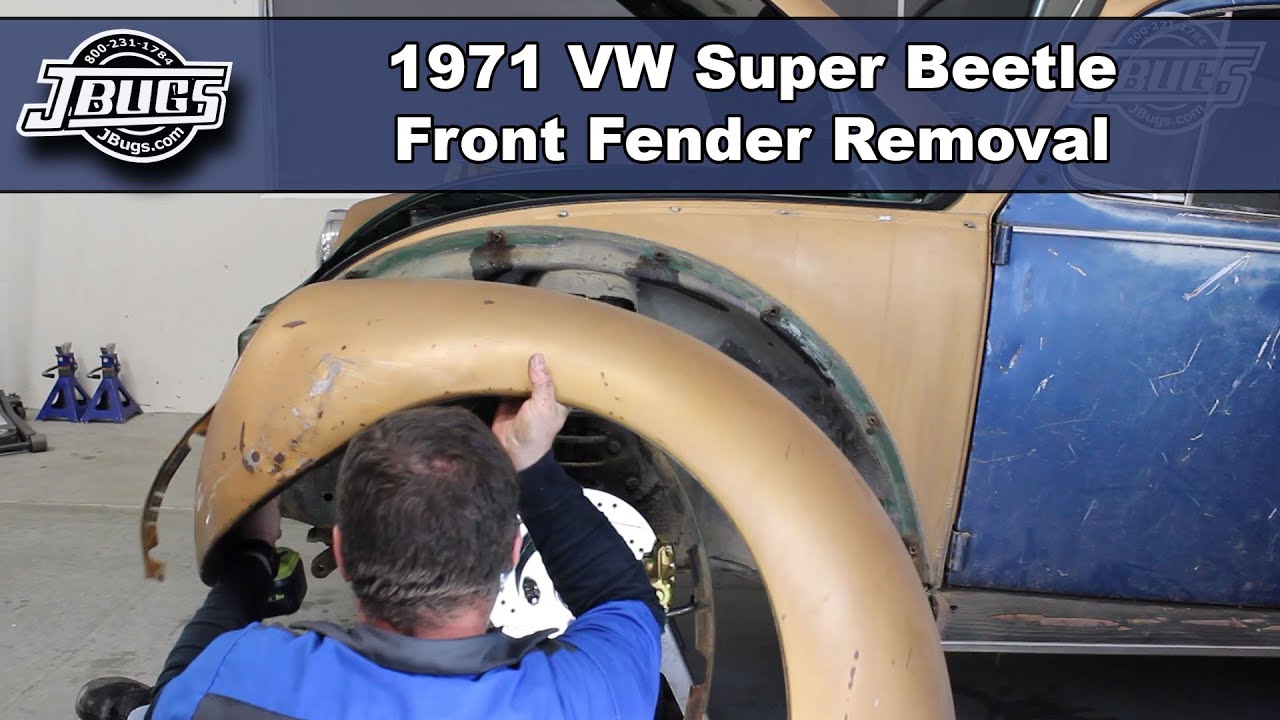
Removing the old fenders is the first step in installing fender flares. Begin by parking your vehicle on a flat and level surface and elevating the front or rear tires, depending on the location of the fender. Disconnect the wiring harness and the antenna, and then remove the fender bolts with a socket wrench.
Once the bolts are out, pull the fender away from the vehicle and set it aside. Lastly, discard the old fender and clean the area where the new fender will be installed. Be sure to properly dispose of the old fender, as it can be hazardous to the environment.
Install Fender Flares
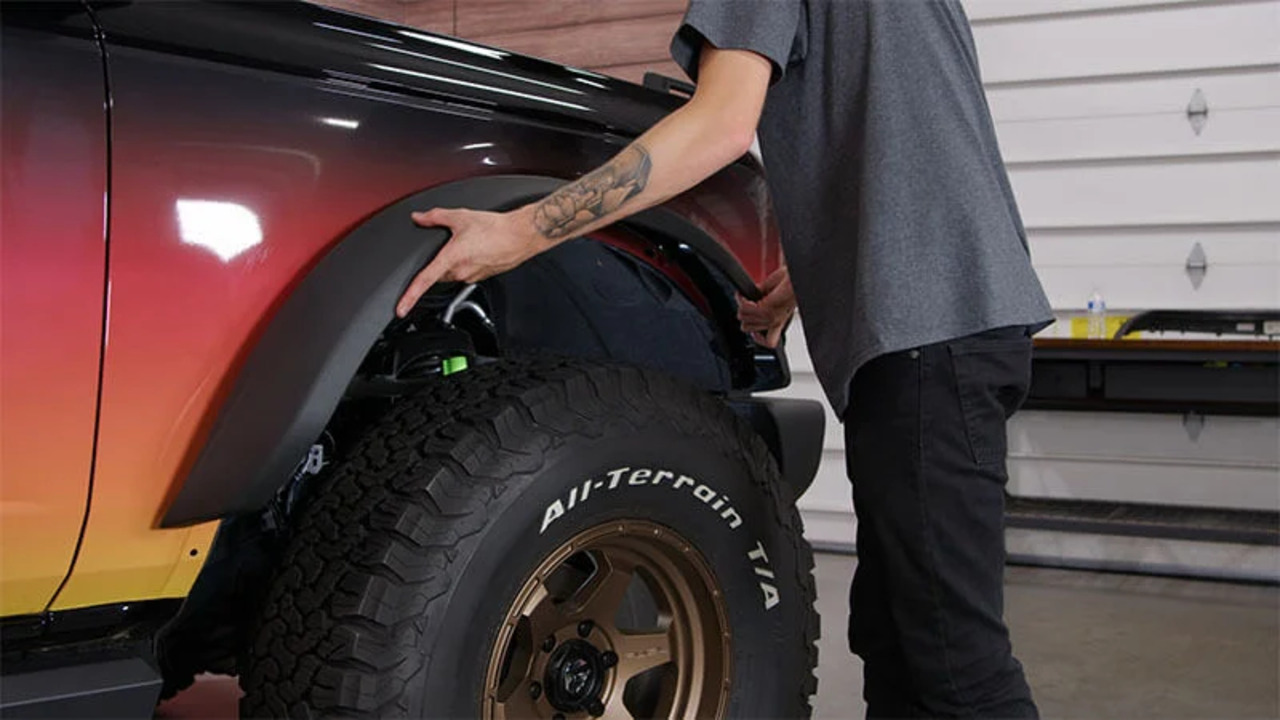
Installing fender flares is a great way to increase the coverage of your tires and give your vehicle a more rugged look. Fender flares are designed to protect the sides of your vehicle from mud, rocks, and other debris that can be thrown up from the tires. Before you install the fender flares, it is important to make sure that your vehicle is properly prepared.
First, you will need to remove any existing trim pieces from the side of your vehicle. Next, you will need to clean the area that will be covered by the flares. Once the area is clean, you can begin to install the fender flares. Start by attaching the mounting brackets to the back of the flare.
You may need to use screws or bolts to secure the brackets. Next, carefully line up the flare with the mounting brackets and secure it in place with screws or bolts. Finally, you can add the finishing touches such as trim pieces or any other features that you desire. Installing fender flares is a fairly easy task that can be completed in an afternoon with the right tools and supplies.
Attach Flares
Once the fender flares have been attached to the vehicle, the next step is to attach the flares to the fenders. This can be done with various methods, such as screws, rivets, or clips depending on the type of fender flare. Make sure to check the instructions that came with your flares to determine the best method for your vehicle.
If you are using screws, you will need to pre-drill the holes into the fender before attaching the screws. If you are using rivets, you will need to ensure that they are properly placed and secured in the fender. Once the fender flares are securely attached to the fenders, you can move on to the next step of the installation process.
Make Necessary Adjustments
Once you have your fender flares installed, it is important to make any necessary adjustments. If the flares are not properly adjusted, they can rub against the tires when driving, resulting in damage. Check the flares to ensure that they are properly aligned and secure. If they are too loose, use the provided hardware or additional screws to tighten them.
Additionally, check the flares for any gaps and adjust accordingly. If your tires are larger than the flares, you may need to use a razor blade to trim the excess rubber. Make sure to wear protective gloves when doing this. Finally, use a rubber sealant to protect the flares from any water damage. With these simple adjustments, your fender flares will be secure and look great!
Secure Flares
Securely attaching the fender flares to the vehicle is the most important step of the installation process. Start by cleaning the area around the wheel wells with soap and water to remove any dirt and debris. Once the area is clean, use a tape measure to ensure that the flares are the correct size for your tires. Next, use the included screws to attach the flares to the wheel wells, making sure that the screws are tight.
If the flares come with clips, use these to ensure the flares are firmly in place. Once the installation is complete, double-check that all the screws and clips are secure. Lastly, clean the flares to get rid of any dirt or debris that may have stuck to them during installation. This will help keep the flares looking new for longer.
Conclusion
Fender flares are an easy way to add extra tire coverage to your vehicle. Installing them is a relatively simple process that can be completed in a few steps. First, you’ll need to remove the old fender flares and clean the area.
Next, install the new fender flares with the provided hardware and secure them in place. Finally, check the alignment and ensure that they are properly secured. With these steps, you can easily add a custom look to your vehicle with fender flares.
FAQ’s
1.What Tools Are Needed To Install Fender Flares?
Ans: The tools needed to install fender flares depend on the type of flares you are installing. If you are installing bolt-on flares, you will need a socket wrench and a drill with drill bits. If you are installing stick-on flares, you will need a tape measure, a utility knife, and cleaning supplies. Additionally, you may need to pick up some sealant or adhesive to ensure a secure fit.
2.How Much Does It Cost To Buy And Install Fender Flares?
Ans: The cost to buy and install fender flares will vary depending on the type and brand of flares purchased and the labor costs of the installer. Generally, the cost will range from $100 to $800 for a set of 4 fender flares. The cost of installation will be separate and will depend on the shop and the amount of time it takes to install the flares.
3.Are There Any Special Instructions For Installing Fender Flares?
Ans: Yes, there are special instructions for installing fender flares. Generally, you will need to clean the area of the fender where the flare will be installed. You will also need to drill holes for the screws and bolts that will be used to secure the fender flare to the vehicle.
The flare should also be secured with a weatherproof sealant to ensure it stays in place. Lastly, you should check the fender flare periodically to make sure it is still securely attached.
4.What Types Of Fender Flares Are Available For My Vehicle?
Ans: The types of fender flares available for your vehicle will depend on the make, model, and year of your vehicle. Common fender flares include pocket style, OE style, and extreme style flares. Pocket style flares are designed to provide a rugged, off-road look, while OE style flares offer a more subtle, factory-installed appearance. Extreme style flares are designed to provide the most aggressive look possible.
5.How Do I Know Which Size Fender Flares To Buy For My Vehicle?
Ans: The best way to determine which size fender flares to buy for your vehicle is to consult the owner’s manual or contact the manufacturer directly. They should be able to provide specific sizing guidelines based on your make and model.
Additionally, you can research online for general sizing guidelines that may be applicable to your vehicle. Lastly, there are usually size charts available when purchasing fender flares that can help you find the correct size.


