
Replacing valve springs is a common and essential task in engine building and modification. This is especially true for Small Block Chevy (SBC) engines, known for their high-performance capabilities.
Installing valve springs may seem daunting if you’re new to engine work, but it’s a relatively straightforward task with the right tools and instructions. In this comprehensive guide, we’ll walk you through the step-by-step process of How to install valve springs on SBC heads.
We’ll cover everything from the tools you need to the techniques you should use to ensure a successful installation. Our guide is designed to easy to follow, even if you’re a beginner, so you can confidently tackle this task independently.
We’ll also provide tips and tricks to help you avoid common mistakes and ensure your new valve springs are properly installed and functioning at their best, whether upgrading your engine for performance or replacing worn-out valve springs.
How To Install Valve Springs On SBC Heads – A Step-By-Step Guideline
If you’re looking to upgrade the valve springs on your Small Block Chevy (SBC) heads, it’s important to know How to install valve springs on SBC heads properly. Here’s a step-by-step guideline to help you get the job done right:
Gather The Required Tools And Materials
To gather the required tools and materials, we need to know the specific task or project you are working on. However, here is a general list of commonly used tools and materials that can be helpful in various situations:
Tools:
- Screwdriver set (including flathead and Phillips’s head)
- Hammer
- Adjustable wrench
- Pliers (regular and needle-nose)
- Tape measure
- Level
- Utility knife
- Drill (corded or cordless)
- Drill bits (assorted sizes)
- Saw (handsaw or power saw, depending on the project)
- Sandpaper (various grits)
- Paintbrushes and rollers
- Wire cutters
- Electrical tester
- Soldering iron (if working with electronics)
- Staple gun
- Chisels
- Clamps
- Stud finder
- Safety equipment (goggles, gloves, ear protection, etc.)
Materials:
- Nails and screws (assorted sizes)
- Wood or metal screws (depending on the project)
- Wood glue
- Adhesive (such as epoxy or super glue)
- Paint or stain
- Sandpaper
- Electrical wires and connectors (if working with electrical installations)
- Plumbing fittings and pipes (if working on plumbing projects)
- Drywall and joint compound (for drywall installation or repair)
- Insulation materials (if working on insulation projects)
- Caulk and sealant
- Lumber or plywood (depending on the project)
- Fasteners (such as bolts, nuts, and washers)
- Safety equipment (such as goggles, gloves, and masks)
Remember, the required tools and materials depend on your project or task. It’s always a good idea to assess the project requirements and consult any relevant guides or instructions before gathering your tools and materials.
Remove The Rocker Arms And Pushrods
When it comes to engine maintenance, sometimes you need to remove certain parts and components to get to the root of the problem. One common task is removing the rocker arms and pushrods.
These parts are crucial to the valve train system, which controls the intake and exhaust valves. The rocker arms are connected to the pushrods and move up and down to open and close the valves.
However, over time, these parts can become worn and require replacement. Remove the valve covers and find the rocker arm assembly to access them. You’ll need to loosen the rocker arm bolts and remove them one at a time, keeping track of which one goes where. Once all the rocker arms are off, you can remove the pushrods.
This process requires precision and attention to detail; you don’t want to mix up the parts or damage anything. Once you remove the rocker arms and pushrods, you can inspect them.
How To Remove The Old Valve Springs And Retainers
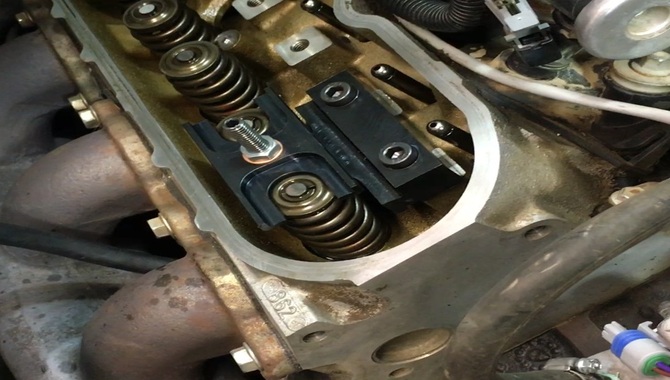
Here are the steps to remove old valve springs and retainers:
- Remove the valve cover and spark plug wires to access the cylinder head.
- Compress the valve spring using a spring compressor tool.
- Remove the valve keepers, which are small metal 4.
pieces that hold the valve spring retainer in place.
- Release the spring compressor tool to remove the valve spring and retainer.
- Repeat steps 2-4 for each valve.
- Inspect all valve springs and retainers for wear or damage and replace them if necessary after removing them.
- Ensure you properly seat and secure the valve springs and retainers with the valve keepers when reinstalling them.
Choose The Appropriate Valve Springs For Your Application
When choosing valve springs for your application, there are several factors to consider to make an appropriate selection. Here are some key points to keep in mind:
- Spring Rate: The spring rate refers to the force required to compress the valve spring by a specific amount. Selecting valve springs with the appropriate spring rate to match the camshaft and overall engine setup is crucial.
- Material: Valve springs are typically made from steel alloys, and different materials can offer varying performance characteristics. Consider heat resistance, durability, and spring longevity when choosing the appropriate material for your application.
- Lift and Duration: The lift and duration of the camshaft significantly impact the valve springs. Higher lifts and longer-duration camshafts put more stress on the springs due to increased valve movement. Ensure the chosen valve springs can handle your camshaft’s specific lift and duration requirements.
- Cylinder Head: The cylinder head design and valve configuration can also influence the choice of valve springs. Factors such as spring seat pressure, retainer-to-seal clearance, and overall clearance within the cylinder head must be considered to avoid interference or binding issues.
- Manufacturer Recommendations: It is always advisable to consult the recommendations provided by the manufacturer of the valve springs and other engine components. They will have specific product guidelines and specifications, considering the intended application and performance goals.
To make the most accurate selection, it is essential to consult with a knowledgeable engine builder, camshaft manufacturer, or performance parts supplier. They can provide expert advice based on your specific engine setup and requirements.
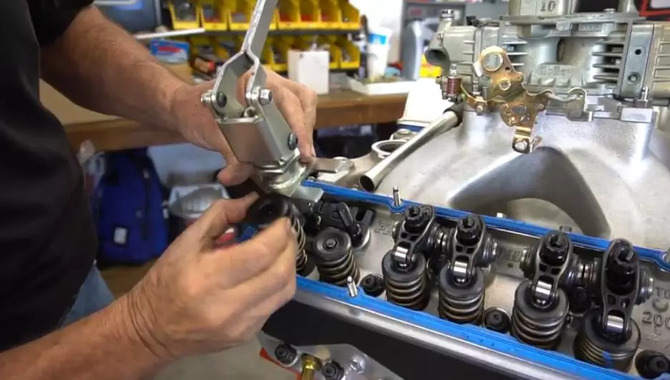
How To Install The New Valve Springs Onto The Cylinder Heads

Here are the steps to install new valve springs onto cylinder heads:
- Remove the old valve springs using a valve spring compressor tool.
- Clean the valve spring seats and surrounding areas with a rag and solvent.
- Lubricate the new valve springs with engine oil and place them onto the cylinder head.
- Install the retainers, locks, and any other necessary components.
- Use the valve spring compressor tool to compress the springs and install the keepers or locks.
- Repeat the process for all the valves in the cylinder head.
- Before reassembling the engine, double-check that you securely seat and properly install the valve springs.
Check The Installed Height Of The Valve Springs
Inspecting and assembling an engine and checking the installed height of the valve springs are important. This measurement refers to the distance between the valve spring seat and the bottom of the valve spring retainer when the valve is closed.
Ensuring the installed height is within the manufacturer’s specifications is crucial, as an incorrect height can lead to valve float, valve train damage, and poor engine performance.
To check the installed height, the valve spring is compressed using a valve spring compressor tool, and the measurement is taken using a dial indicator. If the installed height is too low, the valve spring may not be able to maintain proper pressure on the valve, leading to valve float and potentially damaging the valve and other components.
If the installed height is too high, the valve may not fully close, leading to poor engine performance and potentially damaging the valve and valve seat. It is important to note that different valve springs may require different installed heights, so it is essential to consult the manufacturer.
Adjust The Valve Spring Pressure As Necessary
To adjust the valve spring pressure, follow these steps:
Gather the necessary tools: You’ll need a valve spring compressor, a torque wrench, a set of feeler gauges, and possibly a valve spring pressure tester.
- Remove the valve covers: Start by removing the valve covers to gain access to the valve springs. This step may vary depending on the specific engine and configuration.
- Compress the valve spring: Use a valve spring compressor tool to compress the valve spring on your working cylinder. This will allow you to remove the valve keepers and release the pressure on the valve spring.
- Measure the existing pressure: If you have a valve spring pressure tester, use it to measure the current pressure of the valve spring. This step is optional but can help you determine the adjustments needed.
- Adjust the spring pressure: You can install shims or thicker valve spring retainers to increase the spring pressure. Alternatively, you can use thinner valve spring retainers or remove shims to decrease the pressure.
- Reinstall the valve keepers: Once you’ve made the necessary adjustments to the spring pressure, carefully reinstall the valve keepers to secure the valve spring in place.
- Repeat for other cylinders: Repeat the process for each cylinder, one at a time, until all the valve springs have been adjusted to the desired pressure.
- Reinstall the valve covers: Reinstall the valve covers securely after completing the adjustments on all cylinders.
- Test and verify: Start the engine and listen for any unusual noises.
If you adjust the valve springs correctly, the engine should operate smoothly without excessive valve noise or other issues.
How To Reinstall The Pushrods And Rocker’s Arms
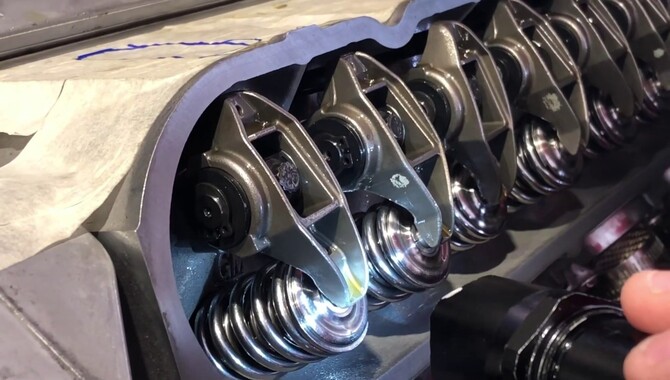
First, reinstall the pushrods and rocker’s arms, ensuring they are clean and debris-free.
Then, lubricate the pushrod tips and rocker arm balls with engine oil. Insert each pushrod carefully into its corresponding lifter and guide it through the pushrod hole in the cylinder head. Next, install the rocker arm on top of the pushrod, ensuring it aligns with the valve stem.
Tighten the rocker arm bolts to the manufacturer’s specifications, usually in a specific sequence. Repeat these steps for each pushrod and rocker’s arm until all are installed properly. Double-check all torque specifications and ensure everything is properly aligned before starting the engine.
Check The Valve Lash
Regular maintenance on your engine is crucial to ensure it runs smoothly and efficiently. Checking the valve lash is one of the essential tasks that you should include in your routine maintenance.
The valve lash is the clearance between the valve stem and the rocker’s arm, and it needs to be adjusted periodically because it can affect the engine’s performance. If the valve lash is too tight, it can cause the valve to stay open, resulting in poor engine performance and potentially causing engine damage.
On the other hand, if the valve lash is too loose, it can lead to valve train noise and reduced power output. To check the valve lash, remove the valve cover and use a feeler gauge to measure the gap between the rocker arm and the valve stem.
If the valve lash is out of specification, you must adjust it by loosening the adjusting screw and turning the rocker arm until you achieve the proper clearance. Following the manufacturer’s guidelines on the recommended valve lash for your specific engine is important.
Check The Ignition Timing
If you’re experiencing issues with your engine performance, it’s essential to check the ignition timing. Ignition timing refers to the precise moment when the spark plug fires in the engine’s combustion chamber.
If the timing is off, it can result in poor fuel efficiency, a loss of power, and potential engine damage. Thankfully, checking the ignition timing is relatively straightforward, and you can do it yourself with the right tools. The first step is locating the timing marks on your engine, usually found on the harmonic balancer.
Once you’ve found these marks, connect a timing light to your engine battery and spark plug wire. Start the engine and shine the timing light on the timing marks to read the current timing.
If the timing is off, you must adjust it by loosening the distributor’s hold-down bolt and rotating it until the timing marks line up correctly. It’s crucial to check the ignition timing regularly to ensure your engine is running correctly and avoid any potential.
Start The Engine And Check For Any Issues
Before starting an engine, starting the engine and checking for any issues is crucial. Turning the key in the ignition and hearing the engine roar to life is satisfying, but it’s important to keep an ear out for any strange noises or irregularities.
The first thing to do is check that all warning lights on the dashboard have been illuminated and then turned off. If any lights remain on, it might indicate a problem that needs to be addressed before driving. Next, it’s time to listen for odd sounds or vibrations while the engine is idling. If there are any unusual noises, it could mean that there’s a problem with the engine, such as a loose belt or a clogged air filter.
Moving on to the next step, pressing the gas pedal will reveal if there are any issues with acceleration or hesitation. If there is a delay in power after pressing the gas pedal, it could indicate a problem with the fuel system or the transmission. Once all of these checks
Conclusion
Knowing How to install valve springs on SBC heads is a crucial task that requires attention to detail and precision. Installing valve springs on SBC heads requires careful attention to detail and a precise approach. Following the steps outlined in this comprehensive guide ensures that your valve springs are installed correctly, and your engine runs smoothly.
Always use the appropriate tools and follow manufacturer guidelines for torque specifications and other critical details. With the right knowledge and techniques, you can confidently tackle this task and enjoy the benefits of a well-functioning engine.
Faq
1.Can I Install Valve Springs On SBC Heads Without Removing The Heads From The Engine?
Ans: No, valve springs cannot be installed on Small Block Chevy (SBC) heads without removing the heads from the engine. The process requires compressing the valve springs, which cannot be done while the heads are still attached to the engine.
2.How Do I Know Which Valve Springs To Use On My SBC Heads?
Ans: The best way to determine which valve springs to use on your SBC heads is to consult the manufacturer’s specifications or a trusted engine builder.
3.Do I Need To Break In The New Valve Springs On The SBC Heads?
Ans: Yes, breaking in new valve springs on SBC heads is recommended. This involves running the engine at varying RPMs for a period of time to allow the springs to settle and establish their proper seat pressure. This helps ensure proper valve operation and prevents premature wear or failure of the springs.
4.What Type Of Spark Plug Is Required For Carbureted Engines?
Ans: The type of spark plug required for carbureted engines is usually a copper core spark plug.
5.What Type Of Pin Is Used With Valve Springs?
Ans: Valve springs commonly use a valve spring retainer pin.

![SBC ARP Rod Bolt Torque Specs [Easy Methods]](https://accuratepicker.com/wp-content/themes/Extra/images/post-format-thumb-text.svg)