
Valve lapping is an essential process every engine builder and mechanic should master to ensure optimal engine performance.
When performed correctly, valve lapping can help improve engine compression, reduce oil consumption, and increase horsepower. Lapping valves can be a challenging task, especially for beginners.
However, the right tools and techniques can become a simple and rewarding process. Provide an ultimate guide on lap valves on SBC (Small Block Chevy) heads. Whether you’re a professional mechanic or an amateur enthusiast, this guide will give you the knowledge and skills to lap SBC head valves successfully.
We’ll take you through the step-by-step process of How to lap valves on SBC heads, including identifying the correct valve size, selecting the right abrasive compound, and using the lapping tool properly. We’ll also provide tips and tricks to make the process easier and more efficient.

How To Lap Valves On SBC Heads – A Step-By-Step Guide
Lapping valves on Small Block Chevy (SBC) heads is a process that helps create a proper seal between the valve and the valve seat. Clean the valve and seat surfaces. Apply a small amount of valve-lapping compound to the valve face. Insert the valve and rotate it back and forth using a valve-lapping tool.
Continue this motion for about 20-30 seconds. Clean the valve and seat, inspecting for a uniform, matte finish. Repeat the process if necessary. Once satisfied, remove the valve, clean all residue, and reassemble the head. Here we give you A step by step guidelines on How to lap valves on SBC heads:
What Are Valve Lapping And Its Benefits?
Valve lapping is a process of smoothing out the surface of the valve and the valve seat to ensure a tight seal.
Engineers commonly perform this process on engines, particularly older models, to improve performance. You can also use valve lapping to fix a leaking valve or prevent one from happening. The process involves applying a grinding compound on the valve seat and manually rotating the valve back and forth until a smooth surface is achieved.
The benefits of valve lapping are numerous.
- First, it promotes better combustion efficiency by ensuring a tight seal between the valve and the seat. This results in improved power output and fuel economy.
- It reduces engine noise as a tight seal prevents air from escaping.
- valve lapping can extend the engine’s life by preventing damage to the valve and the cylinder head caused by leaks.
- this process is cost-effective compared to replacing the whole valve assembly, making it an attractive option for those who want to improve their engine.
Tools Required For Lapping Valves On SBC Heads
Lapping valves on Small Block Chevy (SBC) heads is a precision task that involves removing imperfections between the valve and its seat to ensure a proper seal. Here’s a step-by-step guide on the tools required and the process involved:
Tools required:
- Valve lapping compound: A fine abrasive paste used to grind the valve and seat together.
- Valve lapping tool: A suction cup or a wooden handle with a rubber cup on one end is used to rotate the valve during the lapping process.
- Clean lint-free cloth: To wipe off excess lapping compound and clean the valves.
- Valve spring compressor: Needed to remove the valve springs and retainers for access to the valves.
- Valve stem seal installation tool: If you plan to replace the valve stem seals, this tool will assist in their installation.
It’s important to note that lapping valves are not always necessary or recommended in all situations. Some modern engines may utilize different materials or valve designs that do not require lapping.
Safety Precautions To Take Before Lapping Valves
Before lapping valves, it is important to take several safety precautions to ensure your well-being and prevent any potential accidents. Here are some safety measures to consider:
- Personal Protective Equipment (PPE): Wear appropriate PPE to protect yourself from potential hazards. This should include safety glasses or goggles to shield your eyes from debris, gloves to protect your hands, and a dust mask or respirator to avoid inhaling harmful particles or chemicals.
- Well-ventilated Area: Work in a well-ventilated area or use an exhaust fan to remove any potentially harmful fumes or dust generated during the lapping process.
- Secure Work Surface: Ensure that the work surface is stable and secure. Use clamps or vices to firmly secure the valve, preventing accidental movement during the lapping process.
- Cleanliness: Prior to lapping, clean the valve and surrounding area thoroughly. Remove any dirt, debris, or old gasket material that may interfere with the lapping process.
- Lubrication: Apply an appropriate lapping compound or abrasive paste to facilitate the lapping process.
- Controlled Pressure: Apply consistent and controlled pressure while lapping the valves. Excessive force or uneven pressure can damage or wear on the valve surfaces.
- Proper Technique: Follow the correct lapping technique recommended by the manufacturer or a professional. Improper lapping technique can result in poor valve seating or damage to the valve and seating surfaces.
- Take Breaks: If the lapping process takes an extended period, take regular breaks to avoid fatigue. Tiredness can lead to mistakes and potentially compromise safety.
Safety should always be a priority when working with mechanical components and tools. Following these precautions can minimize risks and ensure a safer lapping experience.
Removing The Valves From SBC Heads
Removing the valves from Small Block Chevy (SBC), heads requires a specific process. Here are the general steps to follow:
Safety First: Before starting any work on the cylinder heads, ensure you have the necessary safety equipment, including safety glasses and gloves.
Cylinder Head Removal: Remove the cylinder heads from the engine block following the manufacturer’s instructions. This typically involves removing the valve covers, rocker arms, pushrods, and head bolts.
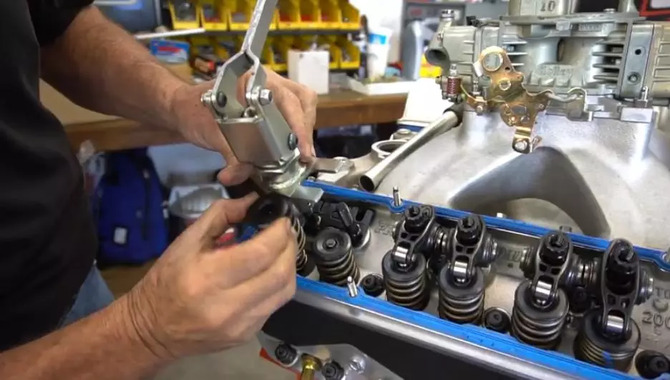
Valve Spring Compressor: Obtain a valve spring compressor tool for SBC heads. This tool compresses the valve springs and removes the keepers holding the valves.
Compression and Removal: Securely attach the valve spring compressor tool over the valve spring.
Release Valve Spring Compression: Slowly release the compression on the valve spring, allowing the valve to move freely. At this point, you can remove the valve from the cylinder head.
Repeat for Each Valve: Remove all the valves in the cylinder head by repeating steps 4 and 5 for each one.
Valve Inspection and Cleaning: Inspect the valves for any signs of damage or excessive wear once you remove them.
Reassembly: To reassemble the heads, follow the reverse order of the valve removal process. Install the cleaned valves back into their respective positions, ensuring proper alignment.
Cylinder Head Installation: Reinstall the cylinder heads onto the engine block using the appropriate torque specifications and tightening sequence specified by the manufacturer.
It’s worth noting that working on cylinder heads requires a certain level of mechanical expertise. If you’re not familiar with this process or lack the necessary tools, it’s advisable to consult a professional mechanic for assistance.
Preparing The Valve-Lapping Compound
Valve lapping is a crucial process for ensuring the proper functioning of engines, and preparing the valve-lapping compound is an important step in this process.
To begin, one must gather the necessary materials, including a valve-lapping tool, a valve-lapping compound, and a valve spring compressor. Once you assemble these items, you can prepare the valve-lapping compound. This compound is typically a mixture of abrasive particles and oil, which work together to smooth out the surfaces of the valves and seats.
Pour a small amount of oil into a clean container to create the compound. Next, a small number of abrasive particles should be added to the oil, and the mixture should be stirred thoroughly until it forms a smooth paste.
The amount of abrasive used can vary based on the engine’s specific needs, but it is important to avoid using too much, as this can cause damage to the valves and seats.
Lapping The Valves On SBC Heads
Lapping the valves on Small Block Chevy (SBC) head is a process used to ensure a proper seal between the valves and their respective seats in the cylinder head. This procedure is typically performed during a valve job or when valves or valve seats are replaced.
Here’s a step-by-step guide on how to lap the valves on SBC heads:
- Remove the valves: Use a socket or valve spring compressor to compress the valve springs and remove the valves from the cylinder head.
- Clean the valves and seats: Thoroughly clean the valves and seats using a suitable solvent or carburettor cleaner.
- Apply lapping compound: Apply a small amount of valve lapping compound to the face of each valve. Spread it evenly across the entire seating surface.
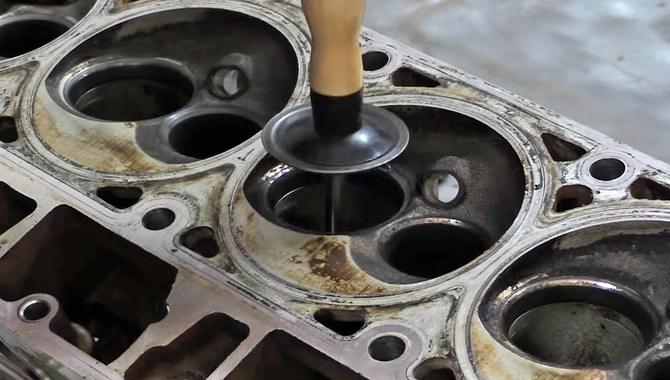
- Attach the lapping tool: Attach the suction cup end of the lapping tool to the valve. Apply a slight downward pressure to hold the valve in place.
- Lap the valves: Insert the valve into its respective seat in the cylinder head. With a back-and-forth twisting motion, rotate the valve using the lapping tool.
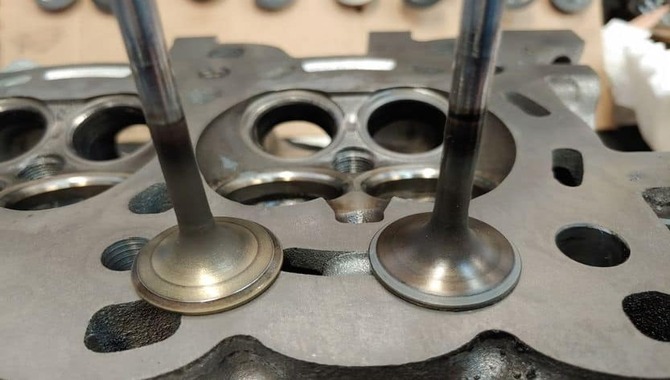
- Check the progress: Remove the valve from the seat and inspect the contact pattern on the valve face and the seat. You’re looking for a consistent and even contact pattern across the entire surface.
- Repeat the process: If the contact pattern is unsatisfactory, clean the valve and seat, reapply the lapping compound, and repeat the lapping process.
- Clean the valves and seats: Once satisfied with the contact pattern, thoroughly clean the valves and seats again to remove any remaining lapping compound.
Modern engines often use hardened valve seats and valves, which may not require lapping. If you’re unsure whether to lap the valves on your specific SBC heads, consult the manufacturer’s recommendations or seek advice from a professional engine builder.
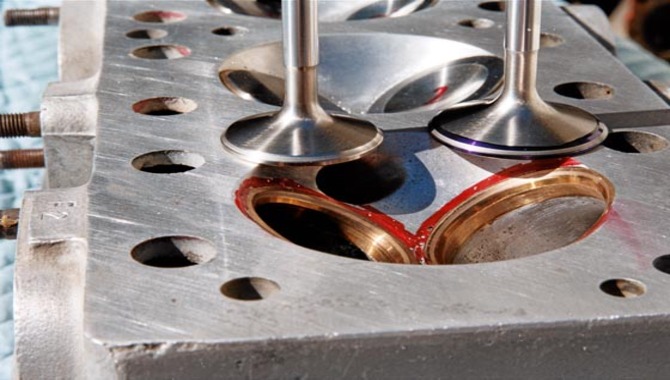
Checking Valve Seat Contact After Lapping
Regarding engine maintenance, checking valve seat contact after lapping is an essential step that shouldn’t be overlooked. Lapping the valve seat involves grinding the valve and the seat together to create a tight seal.
This process is used to restore the valve’s proper sealing surface and improve engine performance. However, after this process, it is essential to check the valve seat’s contact to ensure that the valve is properly aligned and making proper contact with the seat.
If there is any misalignment or poor contact, it can lead to significant engine issues and reduced performance. Checking valve seat contact involves using a special dye to highlight areas that aren’t making proper contact. The dye will show up in areas with a gap between the valve and the seat, indicating that further lapping is required.
By taking this extra step, you can ensure that your engine is running at its best and avoid any potential issues down the line.
Reinstalling The Valves On SBC Heads
To reinstall the valves on Small Block Chevy (SBC) heads, follow these steps:
- Clean the valve guides and valve stems with a suitable solvent and clean them with a lint-free cloth.
- Apply a thin layer of engine oil on the valve stems and insert them into their respective valve guides.
- Once you assemble these items, you can prepare the valve-lapping compound.
- Use a valve spring compressor tool to compress the valve spring and install the valve keepers into the valve stem grooves.
- Ensure the valve keepers are fully seated in the grooves and release the valve spring compressor tool.
- Repeat the above steps for all the valves.
- Once all the valves are installed, reassemble the cylinder head and torque the head bolts to the manufacturer’s specifications.
Following these steps, you can successfully reinstall the Small Block Chevy (SBC) head valves.
Testing The Valves After Lapping

After lapping the valves, it is essential to perform testing to ensure proper functionality and a good seal. The steps involved in testing valves after lapping are typical as follows:
Clean the valves: Before testing, ensure that the valves are thoroughly cleaned to remove any debris or residue from the lapping process. Use a suitable solvent or cleaning solution for this purpose.
Visual inspection: Conduct a visual inspection of the valves to check for any visible damage, irregularities, or signs of wear. Look for scratches, dents, or pitting that may affect the valve’s performance.
Leakage test: Perform a leakage test to verify that the valves are sealing correctly. You can do this using various methods like bubble or pressure testing. For a bubble test, submerge the valve in a solution (usually soapy water) and apply pressure to the appropriate port. If there are any leaks, bubbles will form, indicating an imperfect seal.
Seat contact test: Check the seat contact of the valves. The seat contact refers to the area where the valve seals against the valve seat. Apply a light coat of a contrasting colour (e.g., Prussian blue) to the valve seat and close the valve. Open the valve and inspect the contact pattern.
Operational test: Finally, perform an operational test to check the valve’s performance under realistic conditions. This may involve mounting the valves in their intended system and testing them with appropriate pressures, temperatures, or other relevant factors.
Following these steps, you can effectively test valves after lapping to ensure they function correctly and provide a reliable seal.
Common Mistakes To Avoid When Lapping Valves
When lapping valves, there are several common mistakes that you should avoid to ensure proper sealing and optimal performance. Here are some mistakes to watch out for:
- Insufficient cleaning: Cleaning the valve and valve seat thoroughly is crucial before you begin lapping. Any debris or dirt on the surfaces can affect the lapping process and compromise the final result.
- Incorrect lapping motion: Lapping requires a specific motion to achieve the desired results. It’s important to use a figure-eight or circular motion while applying even pressure to the valve. Avoid using a back-and-forth or straight-line motion, as it can cause uneven wear and an improper mating surface.
- Inconsistent pressure: Maintaining consistent pressure during lapping is essential for uniform material removal. Excessive pressure can result in uneven wear or a concave valve seat, while insufficient pressure may not achieve the desired results.
- Neglecting proper inspection: After lapping the valves, it’s crucial to inspect the mating surfaces for any signs of uneven wear, pits, or scratches. Neglecting this step can lead to poor sealing and reduced engine performance.
- Skipping the final cleaning: Once the lapping process is complete, cleaning the valves and valve seats thoroughly is important to remove any lapping compound residue. Failing to do so can result in the compound entering the engine and causing damage.
Remember, lapping valves requires patience, precision, and attention to detail. By avoiding these common mistakes, you can achieve a proper seal, enhance engine performance, and ensure the longevity of your valves.
Maintenance Tips For Lapped Valves On SBC Heads

Lapped valves on Small Block Chevy (SBC) heads require regular maintenance to ensure optimal performance and longevity. Here are some tips to keep them in good condition:
- Regularly inspect the valves for wear or damage, such as pitting or cracks. Replace any damaged valves immediately.
- Check the valve seats and cylinder head for signs of wear or damage, such as erosion or cracking. Repair or replace as necessary.
- Use a quality valve lapping compound and a lapping tool to reseat the valves periodically. This will ensure proper sealing and prevent leaks.
- Use a valve spring compressor to safely remove and install the valves when performing maintenance.
- Always follow the manufacturer’s recommendations for valve clearance and torque specifications.
By following these tips, you can help ensure that your lapped valves on SBC heads perform at their best and last as long as possible.
Conclusion
Knowing How to lap valves on SBC heads is a crucial task that requires attention to detail and precision. Lapping valves on SBC heads is an essential task that requires precision and patience. Following the steps outlined in this guide will ensure you achieve a smooth and even surface on your valve seats, which can help improve your engine’s performance.
Remember to take your time, be thorough, and use the right tools and materials. With practice, you can lap valves like a professional and keep your engine running smoothly for years.
Faq
1.How Often Should Valve Lapping Be Done?
Ans: Valve lapping should be done whenever the head is removed or if the valves are not sealing properly.
What If The Valves Still Don’t Seal Properly After Lapping?
Ans: If the valves still don’t seal properly, they may need to be replaced, or the valve guides may need to be reamed.
3.Can Valve Lapping Be Done On Any Engine?
Ans: Valve lapping can be done on most engines, but it’s important to consult the manufacturer’s specifications and recommendations.
4.How Do I Know When The Valve Is Properly Lapped?
Ans: The valve and seat should have a smooth, consistent surface with no gaps or rough spots.
5.Can I Lap Valves Without Removing The Head?
Ans: Valve lapping can technically be done without removing the head, but it’s not recommended as it can be difficult to clean and can result in debris getting into the engine.
![How To Choose Patriot SBC Heads? [The Definitive Guide]](https://accuratepicker.com/wp-content/uploads/2022/03/Patriot-SBC-heads.jpg)